
The onset of decentralized finance has seen an influx of investor interest in the cryptocurrency market. They hope they acquire profit from interest on their holdings or long- or short-term asset movements. If you wish to learn more about dYdX, we have reviewed this platform, and here is a guide detailing the step-by-step guide on how to trade on dYdX.
What is the dYdX Platform?
dYdX is a decentralized exchange (DEX) platform that gives out perpetual trading options for more than 35 popular cryptocurrencies, including Bitcoin (BTC), Ether (ETH), Dogecoin (DOGE), and Cardano (ADA). It is one of the outstanding decentralized exchanges regarding the trading volume and market share.
From the start of its founding in 2017 by Antonio Juliano, the platform initially offered crypto margin trading, lending, and borrowing services over Ethereum Layer-1
In August 2021, the dYdX started giving out cross-margin perpetual trading. Cross-margin trading helps users repurpose their available balance on the platform, thus providing liquidity to existing trades. This, in turn, allows traders to avoid liquidations during high volatility.
It is vital to note that the essential emphasis of dYdX is derivative trading. Based on the value of another asset, the price of derivatives shifts over time. Any derivative in the crypto industry is one whose value mainly depends on the price of a particular coin. Such a platform can allow you to trade Bitcoin, Ethereum, USDC, and DAI derivatives.
How to trade on dYdX?
dYdX is a powerful platform when used correctly. We analyzed the platform and wrote a step-by-step guide on what how to use the dYdX platform correctly.
Step 1: Connect MetaMask Wallet and generate Stark Key
You start by transferring funds from the Ethereum mainnet to Starkware. You will head to the official dYdX website and click “Connect Wallet” on the top left-hand side of the page. A popup will then appear that asks you to connect with an Ethereum wallet, such as MetaMask, Ledger, Wallet Connect, or imToken.
For this guide, we use the most popular Ethereum wallet, MetaMask.
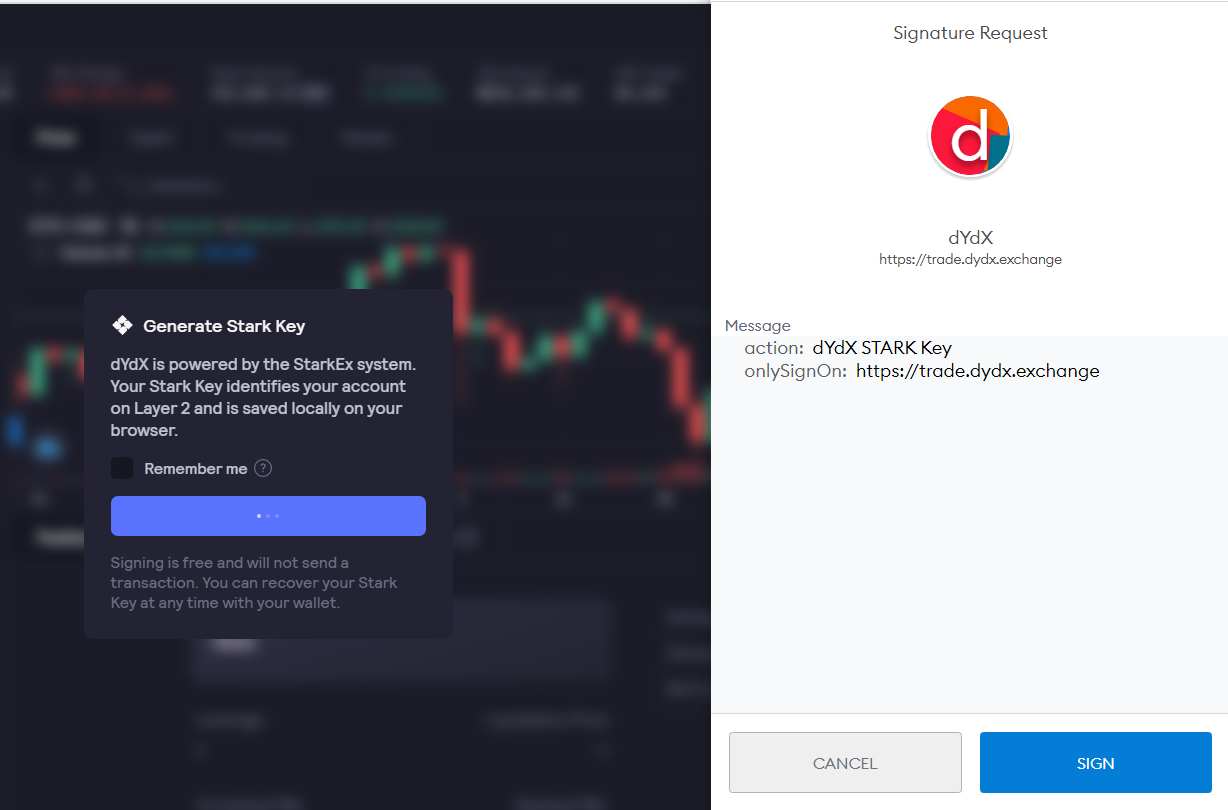
After connecting to the wallet, a popup invites you to generate a Stark Key. The Stark Key is a way to assist with the user’s account’s identity, creating a secure interaction between Layer 1 and Layer 2.
Click on the Generate Stark Key, which generates a Signature request. Sign the transaction, and there is no gas fee to sign.
Step 2: Use Onboarding
After successfully creating a Stark Key, dYdX asks you to acknowledge the legal terms. Then click on “I agree” to proceed. Note that dYdX restricts access to US users.
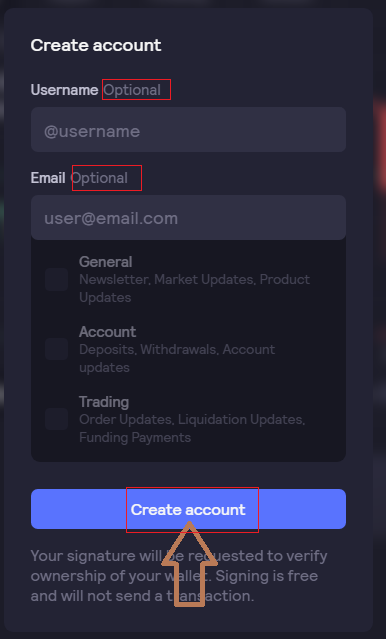
After agreeing to the terms, dYdX will ask you to create an account with an optional username and email address. To sign up without adding a username or email address, skip and click on “Create an account.” A popup will then appear in the wallet that requests a wallet signature, giving access to enter dYdX.
Step 3: Deposit USDC
It is a must that you have a deposit from the Ethereum mainnet for you to begin trading on dYdX. The platform only accepts the stablecoin USD coin (USDC) as trading collateral. You must top up the wallet with USDC if you do not have any funds.
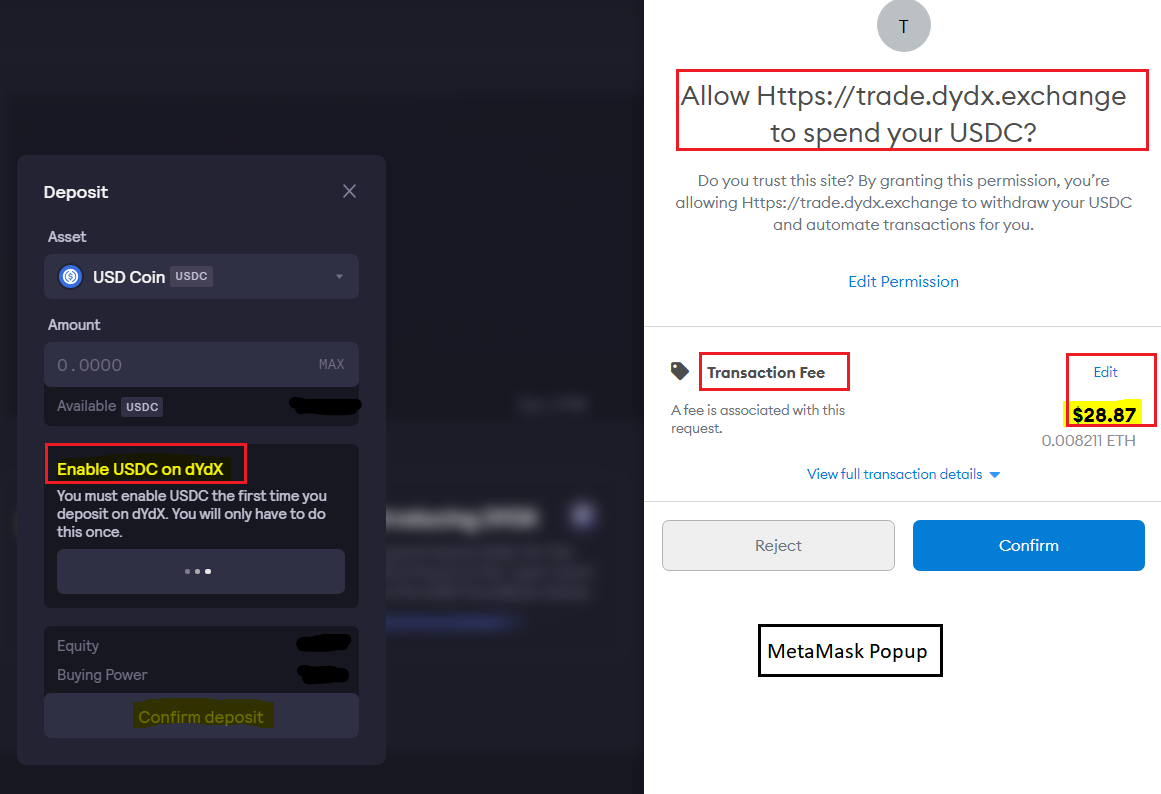
If it is the first time you are adding USDC to dYdX, you must enable spending through your wallet. This allows dYdX to spend USDC from the wallet with the project’s smart contract. To approve the transaction, you must pay a gas fee in ETH.
Consequently, deposit the amount of USDC that you wish to trade with, a transaction that also requires paying a gas fee. USDC then appears on your trading account, allowing you to start selling now.
Step 4: Start Trading
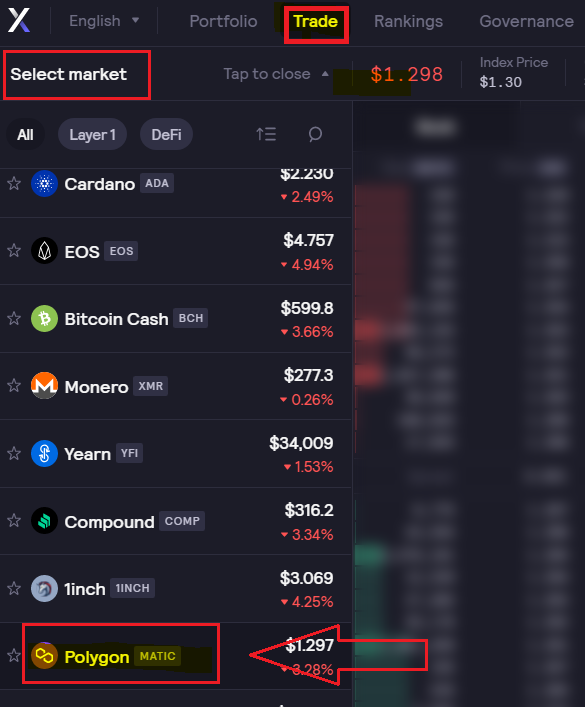
To start trading, you must head to the “Trade” tab and then select a crypto asset that you want to trade. dYdX allows perpetual trading for several significant crypto assets besides Bitcoin. Click on the asset to open the trading window.
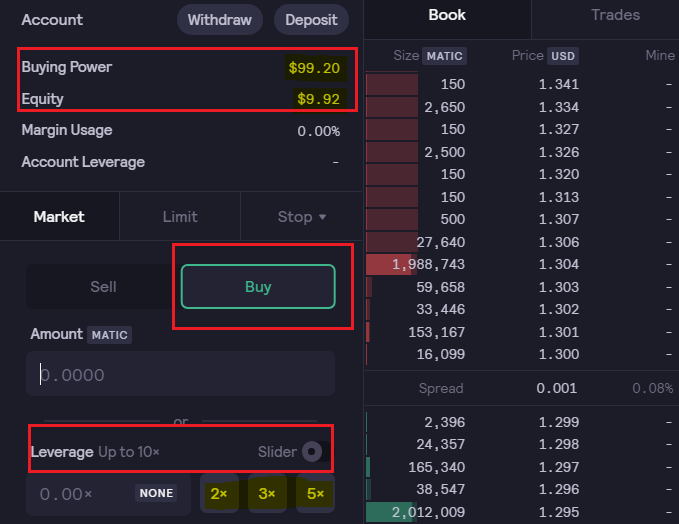
The funds deposited show up as “Equity” in the trading interface.
Leverage in perpetual trading entails the amount of money one borrows from the platform to complete a trade. You must decide on how much leverage to use, which is a vital step in perpetual trading. dYdX allows up to 10 times leverage trading. Using the 10 times leverage makes liquidation if the asset makes a 10% move in the opposite direction of the trade you make.
dYdX liquidates your position after a particular threshold, preventing borrowed capital losses. Before entering the trade, the platform automatically calculated the liquidation price of a position.
Step 5: Going Leveraged Long
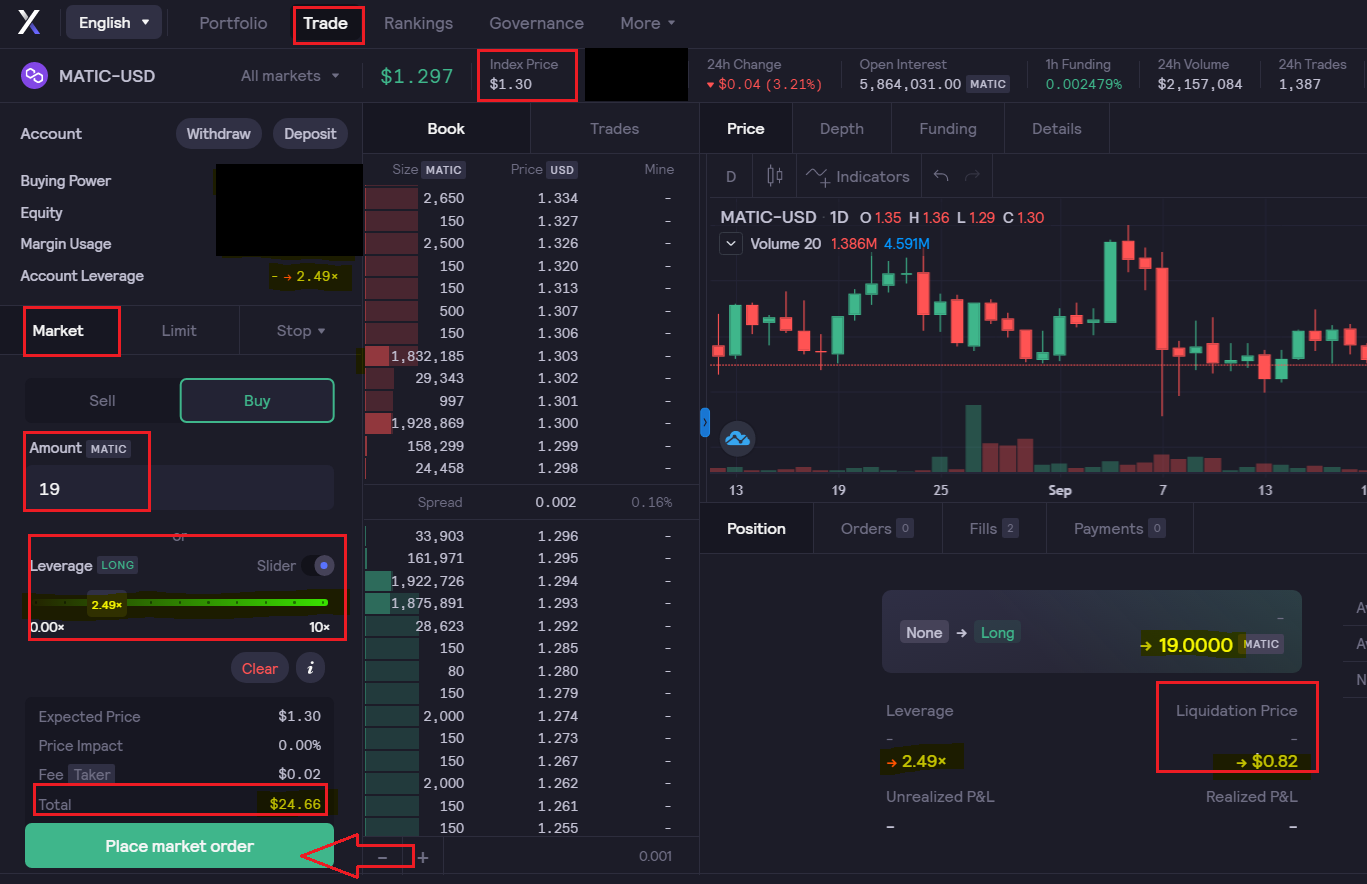
You then scroll on the leveraged slider according to your preferred risk level. Then select “Place market order,” after which the liquidation price shows on the bottom right hand of the page.
As the trade appears as a market order, it is immediately filled. The “portfolio” tab shows all the open positions.
How to Close a Position with Limit Orders
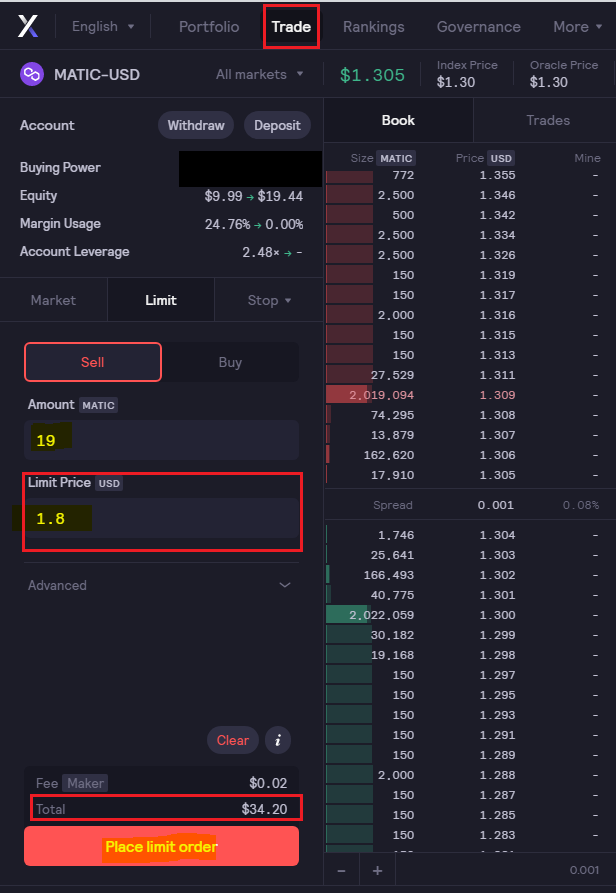
For you to close a position, you can create a limit order that sells the tokens at a specified limit price. You go to the “Trade” tab, place a limit order to sell your asset, and then select a limit price. The platform automatically enters the same leverage used in the prior buy order.
How to Place a Stop Loss
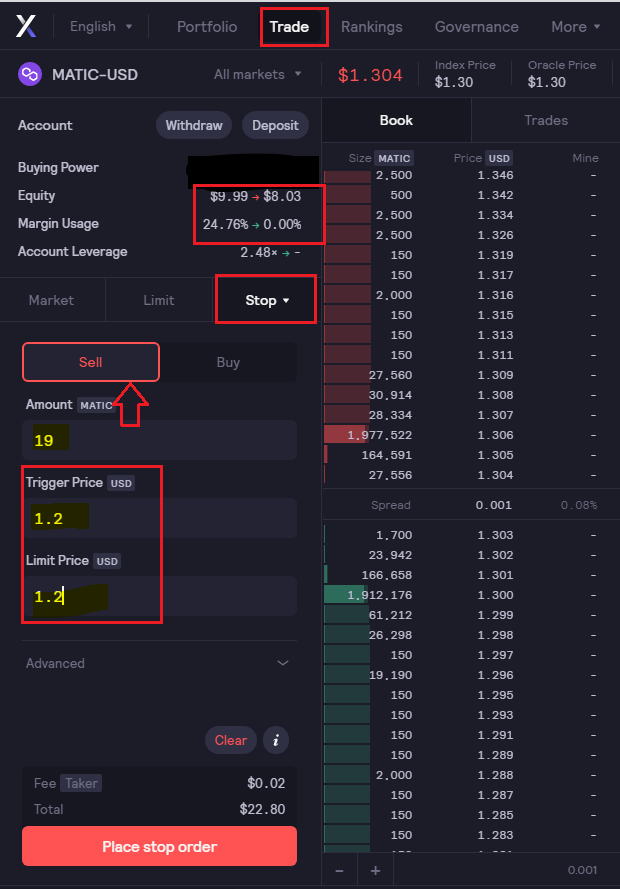
Risk management is crucial in crypto trading, especially when using leverage. The best way to manage risk is to stop loss orders above the liquidation price if you hold a long position.
dYdX also assists one in creating stop loss orders to minimize capital loss from market volatility.
Final Thoughts
dYdX is liquid, combining spot and lending liquidity from various exchanges into a single source.
Derivatives trading remains very risky and is not recommended for beginners. However, if you are looking to trade perpetual crypto assets in a trustless manner, dYdX’s Layer 2 exchange appears to be the best place to get started.
The new StarkWare integration opens up new possibilities when trading perpetual swaps and other derivatives.


